CentOS 7 – Resetting Lost Root Password
You have just discovered that you have forgotten the root password of your CentOS 7 workstation or server. What are you going to do?
If you have access to an account that is a member of the group ‘wheel’, you only need to login with that account and type the following at the shell prompt
$sudo passwd root
[sudo] password for (username) : **********
Changing password for user root.
New password: (Enter New Password)
Retype new password: (Retype New Password)
If you entered and confirmed the password correctly, the shell will return the following, and return you to the shell prompt. For Example.
passwd: all authentication tokens updated successfully.
$
Now we can try switching user to the root account with the new password.
$ su –
NOTE: The switch user ‘su’ command defaults to the account root unless another account is specified. The ‘-‘ option tells the switch user command to load the accounts environment variables.
You then should be prompted with the password prompt, and if the change performed above was successful you should be logged in.
$ su –
Password: *******
Last login: Sun May 29 10:43:00 KST 2016 on tty1
“Wish I had a decent book of quotes!”
-Sysop
#
Notice the shell prompt is now a #, this indicates you are using the root account.
So what if you do not have an account that is a member of the group ‘wheels’?
You will need to boot your system into single user mode.
Here is where it gets rather sticky, as you do not have access to the root account, you will be unable to gracefully shut your server down (unless there is an account that has been given access to the reboot, or shutdown command through the sudoers file), if you run applications on this server that have a database backend like MySQL or MariaBD there is a possibility that data corruption will occur! Proceed at your own risk.
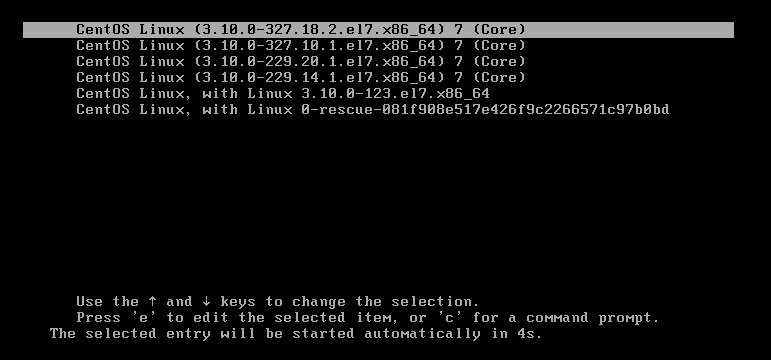
Physically reboot your Centos box.
From the grub bootloader, enter ‘e’ for edit
On the next screen use your cursor keys, and cursor down until you see an entry starting with ‘linux16’, we will be making the following changed on this line. NOTE using your cursor keys, move the cursor keys with your UP / DOWN cursor keys to the beginning of the block of text and use your left cursor key to position the cursor at the end of ‘ro’

Change ‘ro’ to ‘rw init=/sysroot/bin/sh’
NOTE: DO NO COPY THE SINGLE QUOTES. (See screen shots!)
The grub screen should now look like this. (NOTE: What looks like an underscore between init=/sysroot/bin/sh and rd.lvm.kv…. is actually your cursor. There should just be a space here.

Now press ‘Ctrl-x’ to exit and boot into single user mode.
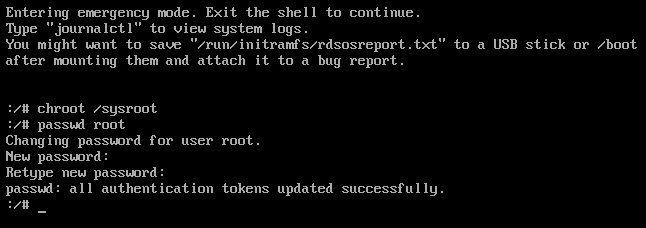
Once you are in single user mode, issue the chroot command as follows.
:/# chroot /sysroot
We can then issue the passwd command to change the root password.
:/# passwd root
Your screen will look like this.
Now update selinux
:/# touch /.autorelabel
Now exit chroot
:/# exit
Finally reboot the system, and test logging in a root.
:/# reboot
This brings up a good point, with it being this easy to change the root password, isn’t this a possible security issue, and if so what can be done to harden the system and prevent someone from coming along, rebooting our Linux machine and changing the root password? The answer to this question is YES! This is a big security hole and there are several things that can and should be done to prevent this sort of attack.
- Set a grub bootloader password.
- Enable root password for single user mode.
- Enable root password for recovery mode.
Performing options 2 and 3, will require you to boot from the CentOS live CD in order to reset a lost root password, and can be circumvented if password is required to access the system BIOS. We will go over these 3 options in next month’s Brent’s World technical blog.
Don’t miss out on our great articles. Register today!
Simple click on this link or direct your web browser to www.catracing.org/hendrb/wp-login.php and click the Register link. It is quick and easy! We will only send you an automated email when new articles are posted, and will never provide your email address to a third party.
Also be sure to check out our forums, and register to join the conversation (Separate login is required.)
www.catracing.org/hendrb/forum
Thanks for reading, and have a great day!