
OS X – Making your terminal look and feel more like Linux
 Making Your OS X Terminal Look And Feel More Like Linux
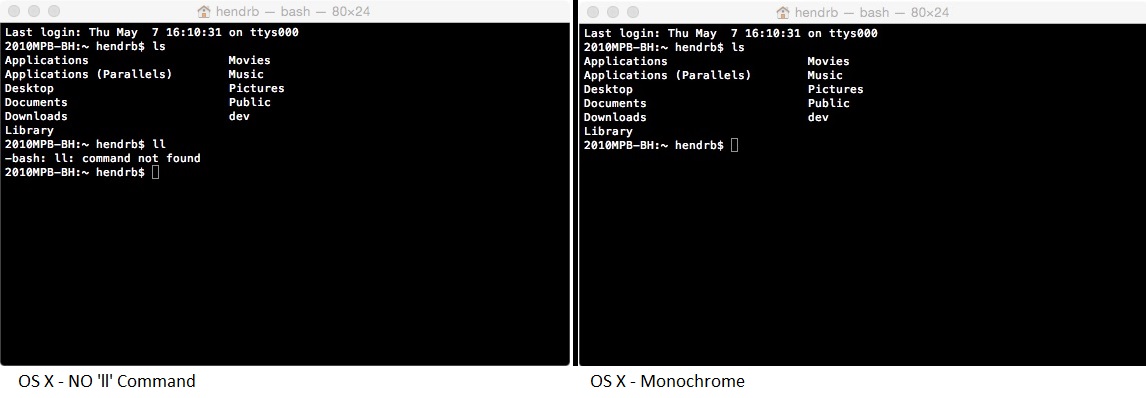
If you are a Mac OS X power user who has spent any time in the terminal, and also used Linux. You will know firsthand that the OS X terminal can look kind of, well dull by comparison. One of the first things that you will notice is missing is the colorized directories, colorized grep output, as well as some of the directory listing shortcuts such as ‘ll’, and ‘l.’
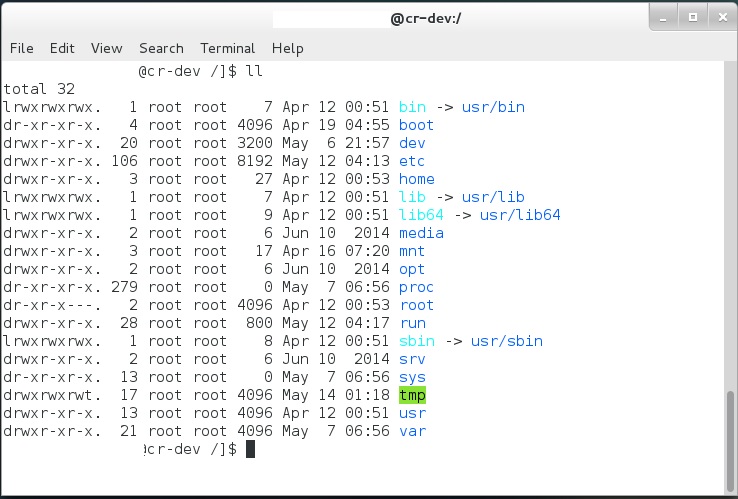
Linux ll command
 In this article we will explore how to modify your OS X terminal experience to match what you are used to seeing when using Linux.
First let’s take a look at the expanded List Directory Contents ‘ls’ command functionality in Linux.
We all know that to list the contents of a directory, in both Unix and Linux you use the ‘ls’ command. We can specify additional options on the command line. Like this
-a displays all files, including hidden files.
-l displays a long directory listing, displaying more information such as POSIX permissions, owner, group and file size information
-h displays “human readable” file sizes in a long listing.
These options can be combined in a single command, so typing ‘ls –lah’ will display a long listing, displaying all files, with “human readable” file sizes.
As mentioned above, most Linux distributions (RHL/CentOS, and Ubuntu), allow you to use the ls command to display a short list, ll to display the long list. Without specifying any options.
How is this done? How can I add the same functionality to my OS X terminal session?
In actuality it is quite easy, and done the same in OS X as it is done in Linux (Linux just happens to already have it in your login script.). It is done using the alias comman.
Alias allows you to set up alias’s for any command, with options, and use the normal command name, or you can choose a different name.
If you have access to a Linux box, open up a terminal windows and type ‘alias’ at a shell prompt. On CentOS 7, you will see the following output.
$ alias
alias egrep=’egrep –color=auto’
alias fgrep=’fgrep –color=auto’
alias grep=’grep –color=auto’
alias l.=’ls -d .* –color=auto’
alias ll=’ls -l –color=auto’
alias ls=’ls –color=auto’
alias which=’alias | /usr/bin/which –tty-only –read-alias –show-dot –show-tilde’
As you can see, in Linux when you use the ls command, it is not just ‘ls’ that is being executed but ls with the –color=auto option <colorizing OS X listing is done differently> which we will cover in the second part of this blog. Stay focused on the alias command for now.
Let’s add the l. and ll functionality right now.
The alias command is pretty straight forward.
Alias <COMMAND>=‘command string’
If you do not still have your OS X terminal window open, please open it again now.
At the command prompt type.
alias l.=’ls –d *’ <Hit Enter>
alias ll=’ls –l’ <Hit Enter>
Now let’s verify that it took your alias entries.
At the command prompt type alias
If the system accepted the alias’s you should now be able to do the following in your shell environment.
l. – Will display only directories in your current working directory
ll – Will display a long listing.
Here is the ll alias working.
Go ahead and test the functionality, while also play around with some of the other options. If you type ll –h for instance, you will see a long directory listing with the filesizes presented in “Human Readable Form” one of the great things about the BASH shell, is that you still have full command substitution available within an alias.
Part II – I also made reference to the ability to colorize the OS X directory listings. This is also done within the alias command, however it is done a bit differently.
OS X uses the –G option in the ls command to output the listing in color.
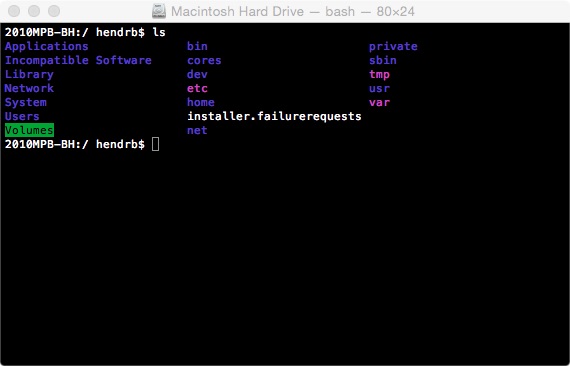
Here is the color ls output.
So let’s add some color to the standard ‘ls’ command
At your shell prompt type,
Alias ls=’ls –G’ <ENTER>
Type alias and <ENTER> to make sure your alias has been entered into the system.
Now let’s go back and add color to the other alias’s we created.
We can simply use command history to go back to the previous commands we have entered. Keep pressing your up cursor key until you see ‘alias ll=’ls –l’. Then use your left cursor key to move your cursor to the right of the single ‘ quote. Simply add the dash – and capital G and hit <ENTER>.
Now if you type the alias command by itself at your shell prompt you should see the modified ll alias.
Let’s try it out by typing ll at your shell prompt.
Here is the ll alias working.
Use command history and go back and add – and capital G to the l. command.
Use the alias command by itself to make sure it took
Test the l. alias.
Very good! You now have color directory listings in your OS X terminal environment.
Part III – Making these changes permanent.
Now that we have made the OS X terminal environment a little more colorful for your everyday use, and made it a perform more like the Linux systems you have been using there is one catch.
These changes are not yet permanent, in fact if we simply closed down our terminal window right now all our aliases would be lost! We do not even need to reboot or shut down our system!
So how do we make these changes stick?
There are a few files we need to modify, and depending on if you want it to apply to only a single user (Your account), or to any account that is on the system and opens a terminal shell or might ssh remotely to the computer.
If you only want the alias’s to be assigned to your shell environment, you need to add your alias commands to the ~\.bash_profile.
NOTE: ~\ is shorthand for YOUR home directory. So ~\.bash_profileis actually located in /Users/<shortname>
So let’s add the alias commands to the .bash_profile file
At your shell prompt enter alias
Select the output of the alias command
Copy the output
Now type nano ~\.bash_profile
Move the cursor to the bottom of any entries already in the file.
Paste your text in the file
Enter CTRL-X
Answer YES to save changes
Hit <Enter> to keep the same filename
Test functionality by typing exit then closing and reopening the terminal window.
Type alias, and you should see that the aliases you added are still there.
If you want to assign the alias’s to all users on the system, then add the above lines to the \etc\profile file.
PART IV – Modifying shell color output
You can specify how to color the specific componate in an ls output by using the LSICOLORS= option in your login script.
Adding LSICOLORS=<COLOR Colorcode> will modify the colors used for outputting the 11 functions.
The default value is, ‘exfxcxdxfxegedabagcad’
I have created this chart for ease of use.
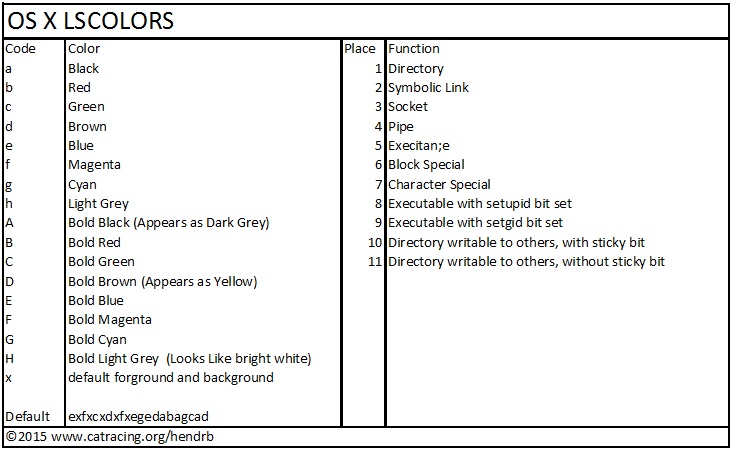 Best practice calls for placing the line CLICOLOR=1 and LSCOLORS=exfxcxdxfxegedabagcad into your login script, but this is not necessary.
There you have it! thanks for reading another Brent’s World OS X terminal / Linux blog! We hope that you enjoyed learning a little more about your system! Please remember, while using alias’s or system customization to make your system easier to use. These modifications will not be available on other system, so practice the original functionality.
Comments
OS X – Making your terminal look and feel more like Linux — No Comments
HTML tags allowed in your comment: <a href="" title=""> <abbr title=""> <acronym title=""> <b> <blockquote cite=""> <cite> <code> <del datetime=""> <em> <i> <q cite=""> <s> <strike> <strong>